Pages

Tuesday, November 2, 2010

ABC Blocks

The age of plain old ABC blocks has come and gone.
You remember them right,
they look something like this:
Here is a new set of DIY ABC blocks!
So fun to customize in any color scheme!
All you need is:
-2"x 2"x8' pieces of wood (purchased at Home Depot)
-a saw to cut the wood into square blocks
- a sander to sand the corners
-paint color of choice
-scrap book paper of choice
- ABC scrapbook letters
-Mod Podge
-paintbrushes

I love this Martha Stewart bandana paper,
it's just so fun and bright!
And a cute bucket to store them in!
It's the perfect gift for a 1st or 2nd Birthday
or Christmas!
In case you're not up for a DIY project at this time
they are for sale in my ETSY SHOP

Tuesday, August 3, 2010

Seeing Stripes

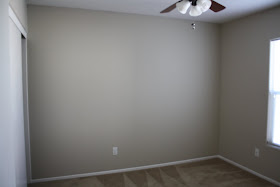
We moved into our new rental house about 2 months ago.
I had no idea what to do in my one year olds room.
It was tan and boring and looked like this:

I'm tired of putting money into rentals, so this time
I decided to go with an inexpensive fix.
I bought 1 gallon of white paint, which was on sale
for $5, and a $7 dollar roll of painters tape.

Here is the end result.


It only took one hour and it turned this boring
room into a sweet and fun nursery.
And when we move out, all I have to do is
paint over that one wall!

Wednesday, July 7, 2010

4th of July Dress/Shirt

I hope everyone enjoyed their 4th of July weekend.
I know we did! We spent it in the cool weather of
Park City, Utah, which was a nice break from
the Vegas heat!
Here is our little one trying to figure out what
to do with that flag, while looking very patriotic!
Her shirt, which originally was made to be a dress,
but it was too cold and too short was completely free!
The blue polka dot fabric was left over from this
dress, and the red polka dot fabric was fabric
that I stole from my Mom's stash
(it had been in there for over 10 years).
I shirred the straps and the top using elastic thread.
Best invention ever by the way! If you haven't
used it yet you're missing out!

Monday, May 10, 2010

Spool No.72 Knock Off

I saw this little dress from Spool No.72
a few months ago and fell in love.
It was more than I wanted to spend ($52) on a
summer dress. And I wanted one that had sleeves.
So what did I do?
Made my own!
I already owned this top (from the Gap Outlet, $6)
so all I had to do was buy 1 yard of "Jelly Bean" green
linen, some thread and some elastic (all for less than $10)
and voila!
I even added the belted sash.
super easy, super inexpensive, and
I love it!

*So next time you see something you love
that's over your price range, don't be afraid to
try and make one yourself*

Thursday, April 8, 2010

Easter dress- pillowcase style

The first sewing project I ever took on was a pillowcase dress
(that was about a year ago)
And after a hundred other projects, I still go
back to the pillowcase dress, it's just one of my faves!
Unfortunately, when your model is 14 months
old it's hard to get a good pic!
The fabric was actually a pillow sham from
Pottery Barn Teen, and I loved it! I picked it
up at the outlet, so it was a great deal.
I took the sham apart, and pieced together
the fabric to make the dress.
I love the bold geometric shapes, and
the band at the bottom!
This is the tutorial I used, it's easy and
straightforward and results in a
cute dress, don't you think?!
check out my previous pillowcase dresses here
Hope everyone had a wonderful Easter!

Friday, February 12, 2010

make your own headbands

headbands are all the rage these days
and instead of spending $10-$12 on one,
why not make your own for just a few dollars.

Here are a few examples of cute and inexpensive options:

1. a cute flower (from the dollar store) embellished with
coordinating tulle and pearls, attached to an alligator clip
for easy removal, and can also be used just as a clip!
note: I take apart the flowers from the dollar store,
and just use 2-3 of the layers of petals

2. linen flower used from scraps of fabric, torn in a long strip
and twirled into a flower shape, also on an alligator clip so you
can interchange different embellishments on the same headband,
also cute with 2 or three of them
note: once you twirl and roll the fabric into a flower shape,
take a few straight pins and stab them in to hold
the flower in place. Then, cut a circle the size of your flower
and attach it on the back using tacky glue.
Remove pins and let dry!
3. simple bow that coordinates with the headband color
(which is gray)
and three varying sizes of loops made from ribbon
(approx a 4 inch loop, a 3 inch loop, and a 3/4 in loop for the center)
It's that easy!
each headband took less than 30 minutes
and cost less than $4

Saturday, February 6, 2010

Vintage Kitchen

I picked up this sweet little kitchen
today at a local thrift store.
This picture was taken from the 1964
Sears Christmas Catalog.

It's in the Coppertone color and includes
the sink, range and fridge
a $27.99 value back in the day,
but I paid $15 for it today.
It needs a lot of cleaning up, but
I am so excited to see how it turns out!

Monday, February 1, 2010

Birthday Bash

Here it is.
The big first birthday bash was a hit!
DIY flower poms
homemade dipped pretzels
homemade cupcakes
homemade cake balls
DIY drink labels
kids table complete with butcher paper
coloring surface
and a DIY hat, skirt, and homemade smash cake
this is what pure joy looks like
pure happiness
it was lots of work, but the pictures will last forever,
and she's worth it!

linking up to DIY day

Monday, January 25, 2010

tshirt revamp

I stopped by Old Navy today and
found Miss A a pair of ugg-ish boots for $3,
and a plain brownish gray long sleeved tee for me for $2.50.
I knew I could come up with something for it!
I've had this shirt/dress thing I wore while I was
pregnant that I've been wanting to do something with
and I'm hoping I'm not going to need it for a few more years
and by then it will probably be out of style,
so I decided to steal the flowers from it.
tshirt + flowers = perfection!
I couldn't be happier with the result!
And the best part is,
I only used 3 of the 13 flowers from the dress!

Linking up to:

ps- somebody is turning 1 on Saturday,
so check back next week for the party pics!

Thursday, January 21, 2010

crepe paper wreath

I started out with a $1 wreath form,
and wrapped it with crepe paper.

Then I cut the crepe paper into strips,
lots and lots of strips.

Take two strips and criss cross them like so...

Pinch the center and gather like so...

And hot glue them to your form.

keep going

when you're almost done,
hot glue a ribbon to the form

finish and hang!

perfect for Valentine's day!


Get 35% off and free shipping at
thredUP.com
with code SIMPLESAGE35